Monitoring & Pause
Jump Hippo shows each tunnel's live state and traffic as it happens. Watch a connection open on first access, see bytes flow, and pause or resume without losing the tunnel.
Tunnel states
Each tunnel shows a three-lamp status signal — red, amber, green from left to right — lighting a single lamp (or none) so position, not colour alone, tells you the live state:
| State | Signal | Meaning |
|---|---|---|
| Disarmed | (all off) | Defined but not bound. No local port, no SSH. |
| Listening | Amber | Armed — the entry port is bound and waiting. No SSH connection yet. |
| Connecting | Amber | A client connected; Jump Hippo is opening the SSH chain. |
| Connected | Green | The SSH connection is live and relaying traffic. |
| Paused | Amber | Live but frozen — traffic is held; the connection is not torn down. |
| Error | Red | The last connection attempt failed. Hover / open the tunnel for the reason. |
A tunnel moves Listening → Connecting → Connected on first access, and back to Listening after it idles out (see Getting Started).
The two views
Toggle between two presentations from the header:
- Cards — a master list on the left and a detail panel on the right showing the selected tunnel's metric cards.
- List — every tunnel as a row in one sortable table, each metric a column.
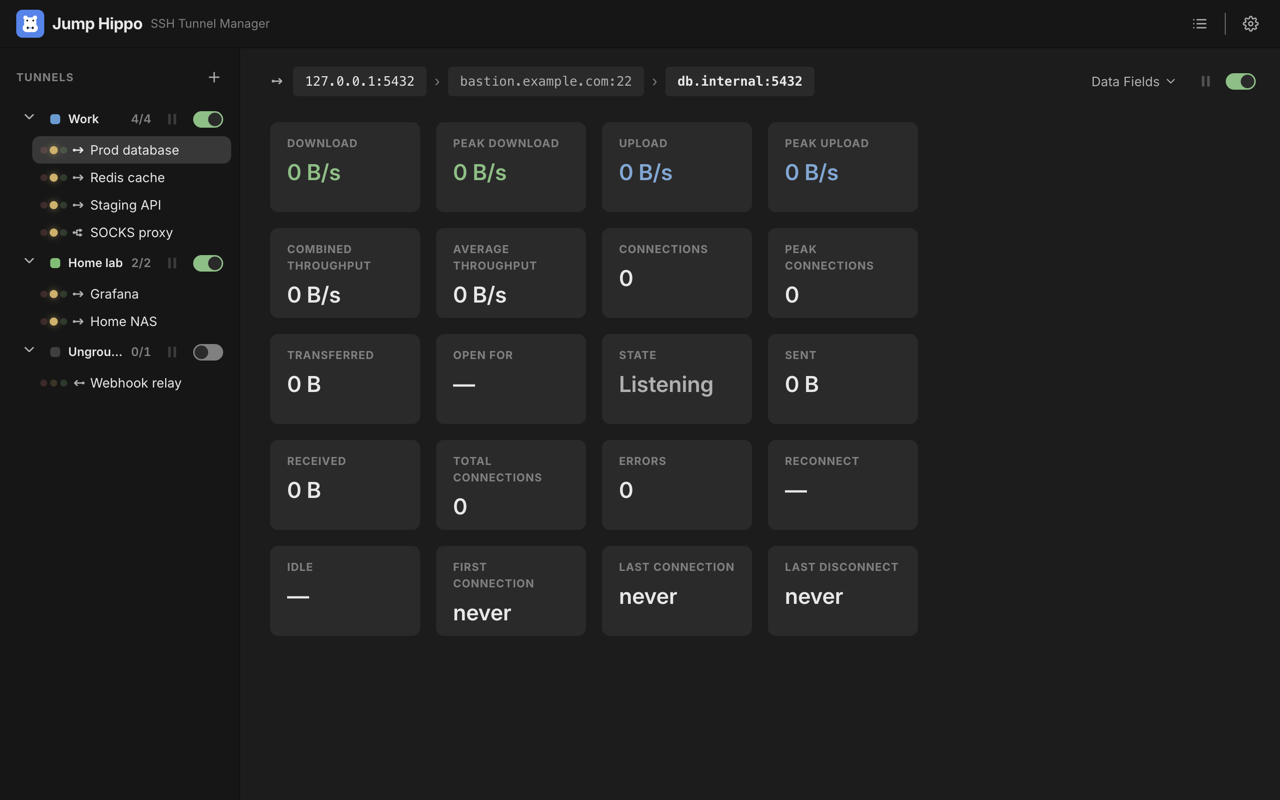
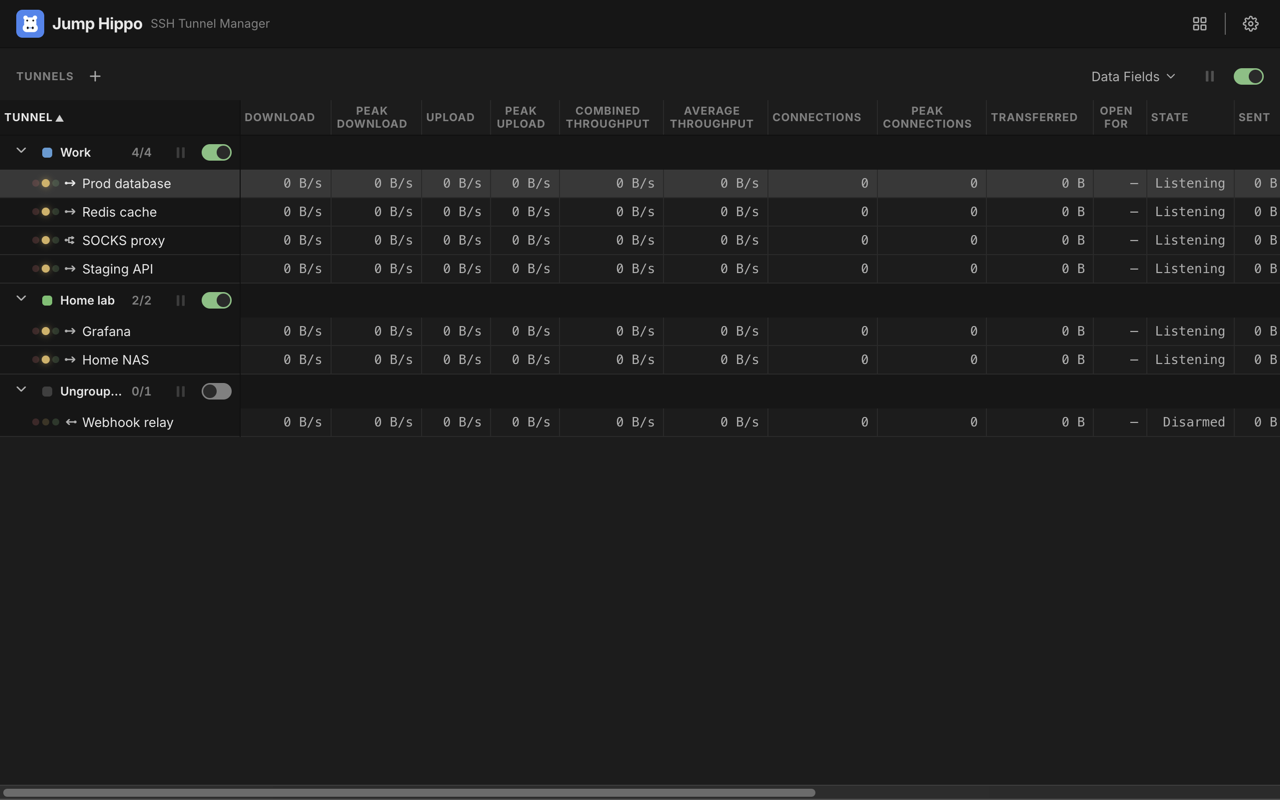
Both views share the same set of metrics, so the Cards checklist doubles as the List view's column chooser. Drag the divider (or a column header in List view) to resize the tunnel-name area; the position is shared between the two views.
In the Cards view the metric cards sit on a snap-to-grid canvas. Drag a card to reposition it: it lifts under the cursor, the grid appears with extra room around your cards, and the card snaps to the nearest cell on release. Drop it on an occupied cell to swap the two — and if you later move the intruder away, the card you displaced slides back to its original cell. At rest the canvas hugs the cards you've placed; it scrolls only when they outgrow the panel. Double-click an empty area to re-centre on your cards. The arrangement is shared across every tunnel — position a card once and each tunnel shows it the same way. Enabling a metric drops its card into the first free cell; disabling one leaves the gap where it was. To remove a card quickly, drag it onto the Data Fields selector — it turns into a trash can, and dropping there hides that field.
Groups
If you organise tunnels into groups, both views render them as collapsible sections in group order, with an implicit Ungrouped section last. Each group header shows a live armed / total count — and, in the List view, a rolled-up ↑/↓ throughput for the whole group — plus an arm-all switch and a pause / resume icon that pauses or resumes every tunnel in the group at once. The header's right-click menu offers Arm all / Disarm all / Pause all / Resume all, which toggle every tunnel in the group in a single step. Collapse a group by clicking its header; the state is remembered across restarts.
Live metrics
Choose which metrics to show. Available cards / columns include:
| Metric | What it shows |
|---|---|
| State | The current state (above). |
| Upload / Download | Live byte-rate out / in. |
| Peak upload / Peak download | The highest rate reached this connection. |
| Combined throughput / Average throughput | Both directions summed live, and the running average. |
| Sent / Received | Total bytes sent / received this connection. |
| Transferred | Total bytes both directions. |
| Open for | How long the current SSH connection has been up. |
| Idle | How long since the last client disconnected. |
| Connections / Peak connections / Total connections | Active client count / high-water mark / cumulative count. |
| First / Last connection, Last disconnect | Timestamps for the session's lifecycle. |
| Reconnect | While a dropped tunnel is retrying, the current attempt number and a live countdown to the next try (see Troubleshooting). |
| Errors | Count of connection errors; open it for the error history. |
Rates and counters update on a live heartbeat while a tunnel is connected.
Pause and resume
Pause freezes a live tunnel: traffic is held, but the SSH connection and the local listener stay up. It's useful to momentarily quiet a chatty tunnel without paying the reconnect cost of tearing it down.
- Pause from the tunnel's controls (or right-click → Pause). The state shows Paused.
- Resume to let traffic flow again.
Pause is different from disarm: pausing keeps everything in place and frozen; disarming unbinds the entry port entirely.
Arm / disarm controls
Each tunnel has arm/pause controls (in the detail panel, or the List view's toolbar for the selected row):
- Arm / Disarm — bind or unbind the entry port.
- Pause / Resume — freeze or unfreeze a live connection (enabled only when the tunnel is connected or paused).
Bulk Arm All / Disarm All live in the File menu and the tray.
Errors
When a connection fails, the tunnel enters Error and its Errors count increments. Open the tunnel (or click the Errors card) to read the reason and the recent error history — connection refused, auth failure, an unresolved host, a changed host key, and so on. See Troubleshooting.