Defining Tunnels
A tunnel definition describes where traffic goes and how the SSH connection behaves. Open the editor with + (Add) or by editing an existing tunnel.
Forwarding types
The Forwarding type selector at the top of the editor chooses which way the tunnel forwards. Every type connects to the same Target server over SSH, optionally through jump hosts, and verifies host keys the same way — only the ends differ.
| Type | Equivalent | What it does |
|---|---|---|
| Local (default) | ssh -L |
Binds a local port and forwards it through the SSH server to a destination. The everyday tunnel. |
| Remote | ssh -R |
Binds a port on the SSH server and forwards connections back to a target on this machine. Use it to expose a local service to the remote side (a webhook to your laptop, say). |
| Dynamic (SOCKS) | ssh -D |
Runs a local SOCKS5 proxy; point a browser or app at it and every connection is forwarded through the SSH server. Reaches any host the server can, with no per-host tunnel. |
The address fields relabel themselves to match the type — a Local tunnel shows Entry / Exit ports, Remote shows a Remote bind and a Local target, and Dynamic shows just the SOCKS port. Existing tunnels are all Local and are unchanged.
Remote forwarding notes
The Remote bind is a bare port (bound on the server's loopback) or an
address:port. Binding a non-loopback address on the server — so other hosts
can reach it — only works if the server's sshd has GatewayPorts enabled;
Jump Hippo warns you, but only the server can allow it. A remote tunnel connects
eagerly on arm (the server-side listener only exists while the SSH connection
is up) and re-establishes on a drop.
Dynamic (SOCKS) notes
The SOCKS proxy is CONNECT + no-auth — the profile browsers and CLI tools use.
It connects lazily on the first request and idle-tears-down like a local tunnel.
Point your client at 127.0.0.1:<port> (e.g. curl --socks5 127.0.0.1:1080 …).
The three addresses
(For a Local tunnel — see Forwarding types for how the fields change for Remote and Dynamic.)
Jump Hippo routes traffic through three points:
| Field | What it is | Examples |
|---|---|---|
| Entry port | The local port Jump Hippo binds and listens on. | 5432 (binds 127.0.0.1:5432), 0.0.0.0:5432 |
| Target server | The SSH server the tunnel connects to (the last hop). | bastion.example.com, bastion.example.com:2222 |
| Exit port | (optional) Where the SSH server forwards your traffic. | db.internal:5432 |
Read a tunnel as entry port → (SSH through the target server) → exit port. If
you leave the exit port blank, traffic is delivered to the target server itself
(127.0.0.1) on the same port as the entry port. A bare host reuses the entry
port; a bare port targets 127.0.0.1.
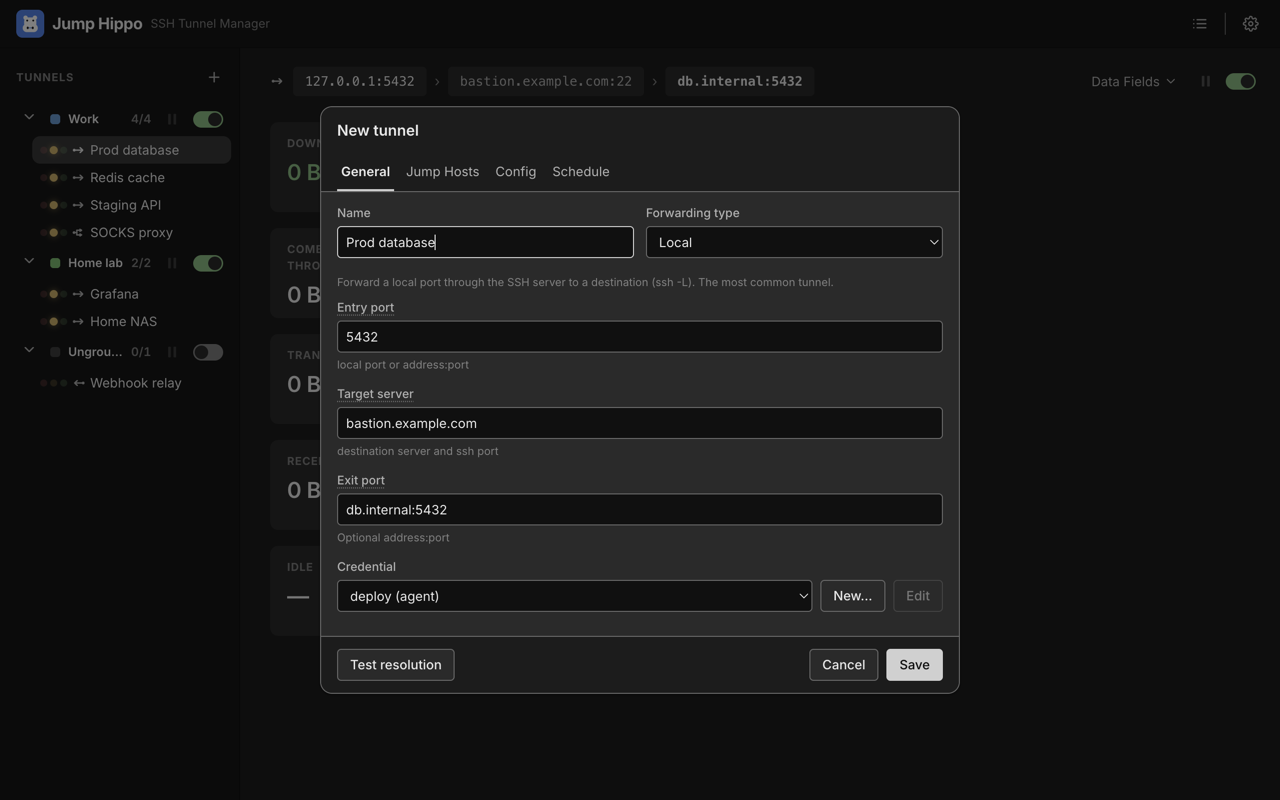
Entry port and binding scope
A bare port binds to loopback (127.0.0.1) — reachable only from your own
machine. This is the default and the safe choice.
To expose the port to your LAN, enter an explicit address such as 0.0.0.0:5432.
This lets other devices on your network reach the tunnel, so only do it when
you mean to. See Security → Binding scope.
The default bind host for bare ports is configurable in Settings → Defaults.
Authentication
Each tunnel uses an SSH credential — a saved identity (user + auth method). Pick or create one in the editor's authentication section. Credentials are reusable across tunnels and jump hosts. See Authentication.
Jump hosts
Add one or more jump hosts to route through a chain of SSH servers before reaching the target. Jump hosts are reusable records; see Jump Hosts.
Connection behaviour
Three options control the SSH connection's lifecycle, on the editor's Config tab:
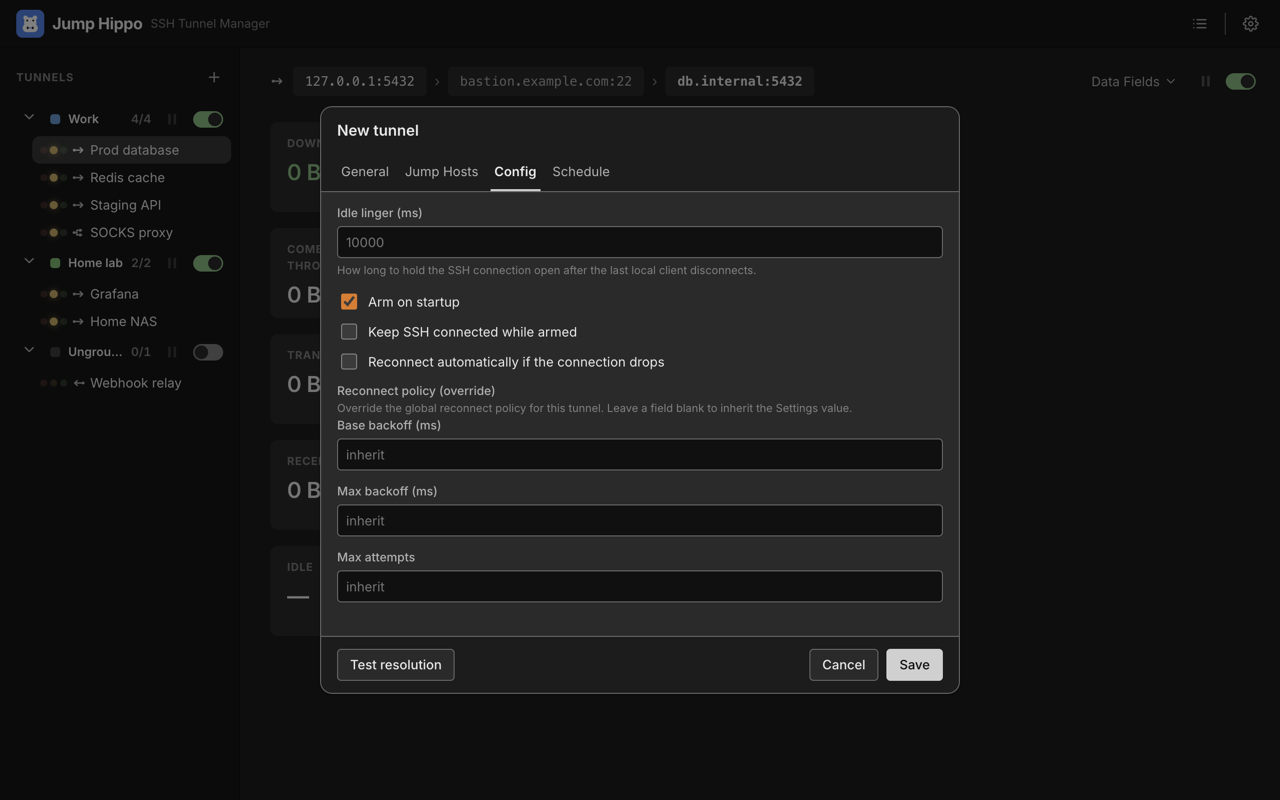
Idle linger (ms)
How long Jump Hippo holds the SSH connection open after the last client disconnects, before tearing it down. The default is 10 000 ms (10 seconds).
- A longer linger avoids reconnect churn for apps that open and close connections frequently.
- A shorter linger frees the remote session sooner.
- The local entry port stays bound regardless — linger only governs the SSH connection.
The default for new tunnels lives in Settings → Defaults.
Keep SSH connected while armed
Off by default. When on, the SSH connection is opened as soon as the tunnel is armed and held open continuously — trading the "only connect when used" savings for zero first-byte latency. Use it for a destination you hit constantly.
Reconnect automatically if the connection drops
Off by default. When off, if a live SSH connection drops unexpectedly, Jump Hippo returns the tunnel to Listening and re-establishes it on the next access — no wasted reconnects to a destination you're done with. When on, it re-establishes the connection immediately (with backoff) so a long-lived client survives a transient network blip.
Arming and "Arm on startup"
Arming is the live action that binds the entry port. The editor's collapsible Advanced section has an Arm on startup toggle that controls whether a tunnel arms automatically when Jump Hippo launches and whether it's swept up by Arm All. Turn it off to keep a tunnel's definition but leave it out of both — you can still arm it by hand.
Groups
Once you have more than a handful of tunnels, groups keep the list readable. A group is a reusable label with a colour (for example Work or Home lab); a tunnel belongs to zero or one group. Groups are purely organisational — they never change how a tunnel connects.
- Create a group from any tunnel's right-click menu → Assign to group ▸ New group….
- Assign a tunnel by dragging its row onto a group header — or, when the group is expanded, onto any tunnel already in it — or via Assign to group on the row's right-click menu. Choose Ungrouped to remove it.
- Order tunnels within a group (Cards view): as you drag a row, a blank slot shows exactly where it will land. Drop it there to both set its group and place it at that position. Dropping away from any group cancels the move.
- Reorder groups by dragging their headers. Collapse/expand a group by clicking its header; the collapsed state is remembered across restarts.
- Rename or recolour a group from its header's right-click menu → Edit group….
- Delete a group from that same header menu (Delete group…). Its tunnels are kept — they simply fall back to the Ungrouped section.
Each group header shows an armed / total count, an arm-all switch, and a pause / resume icon that pauses (or resumes) every tunnel in the group at once. Its right-click menu offers Arm all / Disarm all / Pause all / Resume all. Groups also appear in the tray and the File ▸ Groups menu with per-group arm-all / disarm-all.
Editing a live tunnel
You can edit an armed or connected tunnel. Jump Hippo reconciles the change: edits that don't affect the live connection apply immediately; edits that change the route (addresses, auth, jumps) take effect on the next connection, so an in-flight session isn't ripped out from under a connected client.
Testing resolution
Before saving, use Test resolution to check that every host in the chain resolves and is reachable. This walks the real SSH chain and probes the destination from the far end — it's protocol-only (it never runs a command on a remote host) and prompts for host-key trust exactly as arming would. See Host Keys & Trust.